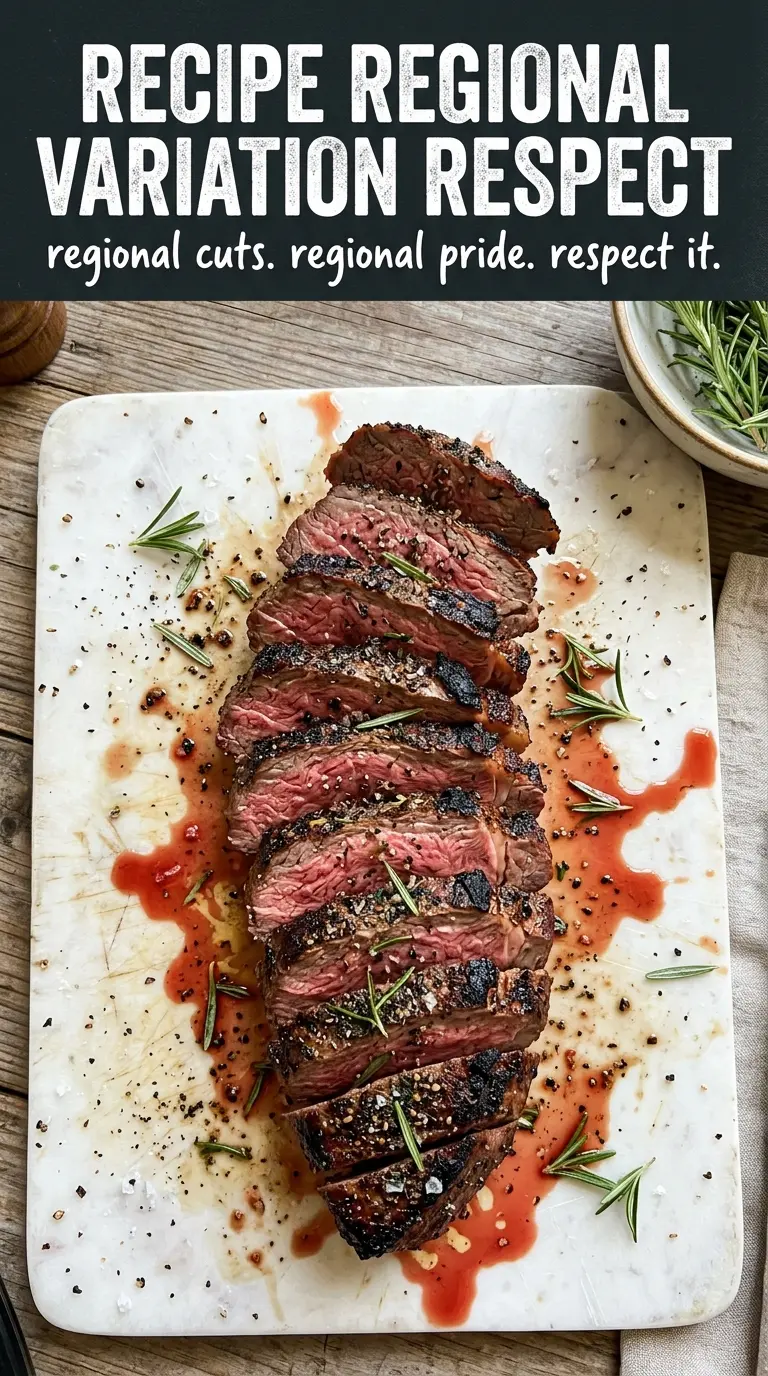
Tri-tip earns its keep when the outside turns deeply browned and seasoned and the center stays juicy, pink, and sliceable. It’s the kind of roast that feels bigger than the effort it asks for, especially when you build a hard crust first and then stop cooking at medium-rare instead of pushing it too far. Slice it against the grain and every piece stays tender enough to pile onto a plate without falling apart.
The rub here is straightforward on purpose: salt, pepper, garlic, paprika, and oregano give you that Santa Maria-style beefy edge without burying the meat. Olive oil helps the spices cling and gives the surface enough fat to brown well. The real payoff comes from two things that matter with tri-tip: a proper rest at room temperature before cooking, and a final rest after it comes off the heat so the juices settle instead of running all over the cutting board.
Below I’ve laid out both the grill and oven method, plus the part that most people get wrong when they carve tri-tip. The slicing direction matters just as much as the cooking time, and once you see how to read the grain, the whole roast gets easier.
The crust got beautifully dark on the grill and the center stayed pink after resting exactly like you said. Slicing it against the grain made a huge difference — not a tough bite anywhere.
Save this grilled or oven-roasted tri-tip for the nights when you want a deep crust and a pink center without babysitting the roast.
The Part That Keeps Tri-Tip Tender Instead of Stringy
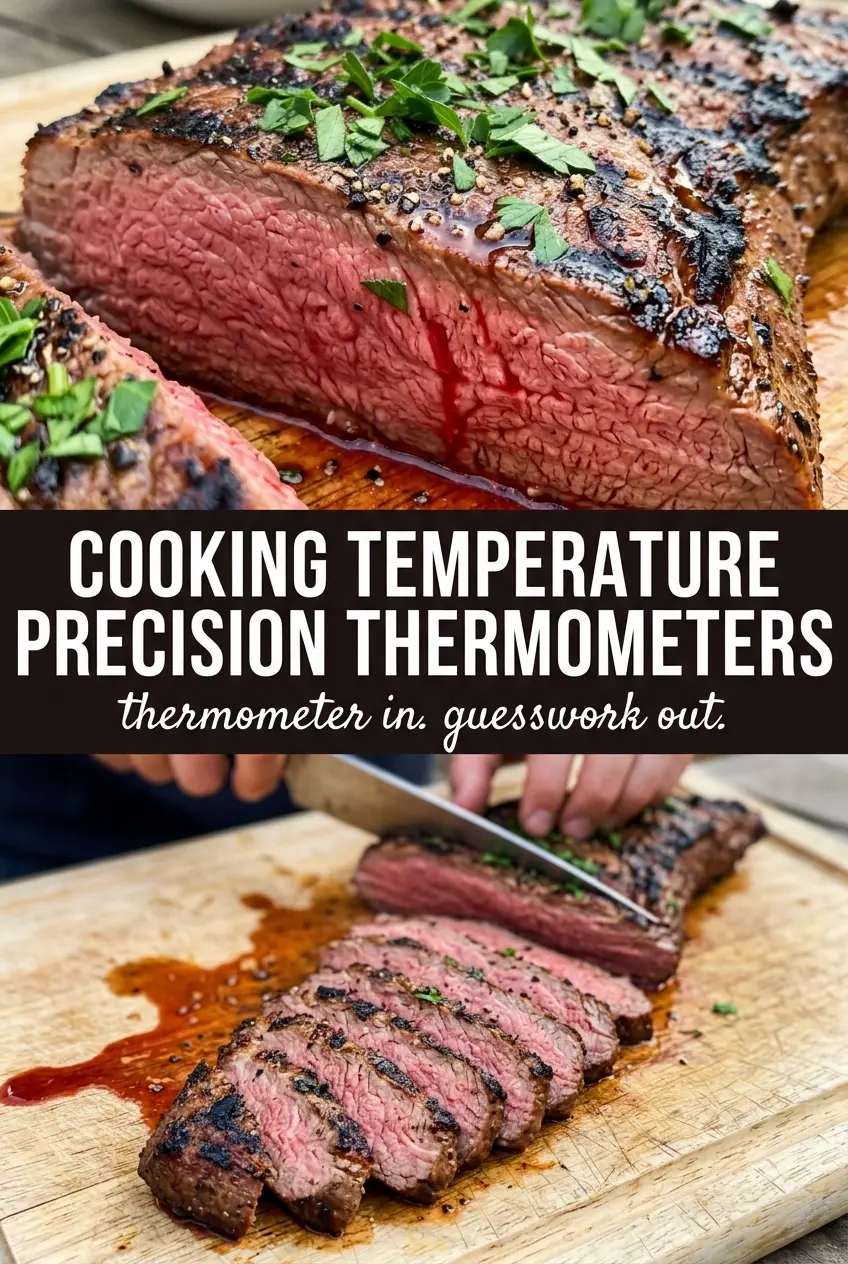
Tri-tip has a reputation for going chewy when it gets treated like a standard roast. The fix is simple: cook it hot enough to develop a crust, then stop as soon as the center hits 130-135°F for medium-rare. Past that point, the leaner sections dry out fast, and the grain gets tougher instead of more flavorful.
The other thing people miss is that tri-tip isn’t cut from one uniform direction. The grain changes across the roast, so a straight-down slice in one direction can leave half the pieces long and fibrous. A short rest after cooking helps the juices settle, but the real tenderness comes from reading the grain before you cut.
What the Rub and Oil Are Doing Here
- Olive oil — This helps the spice mix stick and encourages the surface to brown instead of drying out. You don’t need a fancy oil here; a basic one works fine because it’s acting as glue and heat conductor, not flavor.
- Kosher salt — This does the heavy lifting. It seasons the meat all the way through and helps the exterior dry just enough to form a better crust. Table salt can work, but it’s denser, so the amount would need adjusting.
- Paprika and garlic powder — These give the roast that warm, savory coating that tastes like more effort than it takes. Fresh garlic won’t do the same job in a dry rub because it can burn before the beef is done.
- Dried oregano — This is the small addition that makes the rub taste more like a proper Santa Maria-style roast and less like plain seasoned beef. If you don’t have oregano, you can leave it out, but the rub loses some character.
Getting the Sear, Heat, and Rest in the Right Order
Building the Rub
Mix the salt, pepper, garlic powder, paprika, onion powder, and oregano first so the seasoning is evenly distributed before it hits the meat. Rub the tri-tip with olive oil, then coat every side generously. If the roast looks lightly dusted instead of fully seasoned, it’s underdone on the outside and the crust won’t taste finished.
Letting the Meat Lose the Chill
Set the seasoned tri-tip out at room temperature for about 30 minutes. That short rest helps the roast cook more evenly from edge to center, especially on the grill where the surface heat is intense. Don’t leave it out for hours; you want it to warm slightly, not linger.
Grilling for a Deep Crust
Start over high heat for about 5 minutes per side to build that browned exterior, then move the roast to indirect heat until it reaches 130-135°F. If the outside is dark before the center is close to done, the direct heat was too aggressive or the grill lid stayed open too long. Pull it while it still looks a touch under because carryover heat will finish the job during the rest.
Oven-Roasting for Reliable Results
For the oven method, sear the tri-tip in a hot skillet first, then roast at 425°F for 20-25 minutes to medium-rare. The skillet step matters because dry oven heat alone won’t give you that crusty exterior. If the pan smokes heavily, it’s hot enough; if nothing sizzles when the meat goes in, the sear won’t hold.
The Final Rest and Slice
Let the roast rest for 15 minutes before slicing. That pause keeps the juices inside the meat instead of running out the moment the knife hits it. Slice against the grain, and if the grain changes direction halfway through the roast, turn the meat before you keep cutting.
How to Change the Method Without Losing the Roast
Make It Santa Maria-Style
Serve the sliced tri-tip with grilled onions, beans, and a simple salad, or add a little extra black pepper in the rub for a sharper bark. This keeps the roast rooted in the classic beef-and-fire style without changing the cooking method.
Go Gluten-Free Without Changing the Texture
This recipe is naturally gluten-free as written, so the main job is keeping the seasoning blend clean. Check packaged spices if you’re cooking for someone sensitive to cross-contamination, since that’s where hidden additives usually show up.
Use the Oven When the Grill Isn’t an Option
The oven version gives you nearly the same result as grilling, especially if you use a cast iron skillet for the sear. You lose a little smoke and char, but you gain control, and the roast still slices pink and tender.
Storage and Reheating
- Refrigerator: Store sliced tri-tip in an airtight container for up to 4 days. It stays best when kept in its juices or with a spoonful of pan drippings.
- Freezer: Freeze tightly wrapped slices for up to 2 months. Freeze in portions so you can thaw only what you need, since repeated thawing dries the meat out.
- Reheating: Warm gently in a covered skillet with a splash of broth or pan juices over low heat. High heat is the mistake here; it turns a medium-rare roast gray and tough before the center warms through.
Answers to the Questions Worth Asking
Tri Tip - Grilled or Oven-Roasted
Ingredients
Equipment
Method
- In a bowl, mix kosher salt, black pepper, garlic powder, paprika, onion powder, and dried oregano until evenly combined (no dry pockets remain).
- Pat the tri-tip roast dry and rub it all over with olive oil to create a sticky surface for the seasoning.
- Press the spice rub onto the tri-tip roast and coat generously so the exterior looks well-speckled and thickly seasoned.
- Let the tri-tip roast sit at room temperature for 30 minutes while the rub clings and the surface dries slightly for better crust formation.
- Preheat the grill for high heat and sear the tri-tip over direct high heat for 5 minutes per side, until a deep brown crust forms.
- Move the tri-tip to indirect heat and cook until the thickest part reaches 130-135°F for medium-rare, using a thermometer for an accurate target.
- Heat a hot skillet and sear the tri-tip on the stovetop to build color on the surface before roasting.
- Roast at 425°F for 20-25 minutes until the thickest part reaches 130-135°F for medium-rare.
- Rest the tri-tip for 15 minutes on a cutting surface so juices redistribute and the center stays pink.
- Slice tri-tip against the grain into thin strips to show the crusty exterior and pink medium-rare interior.