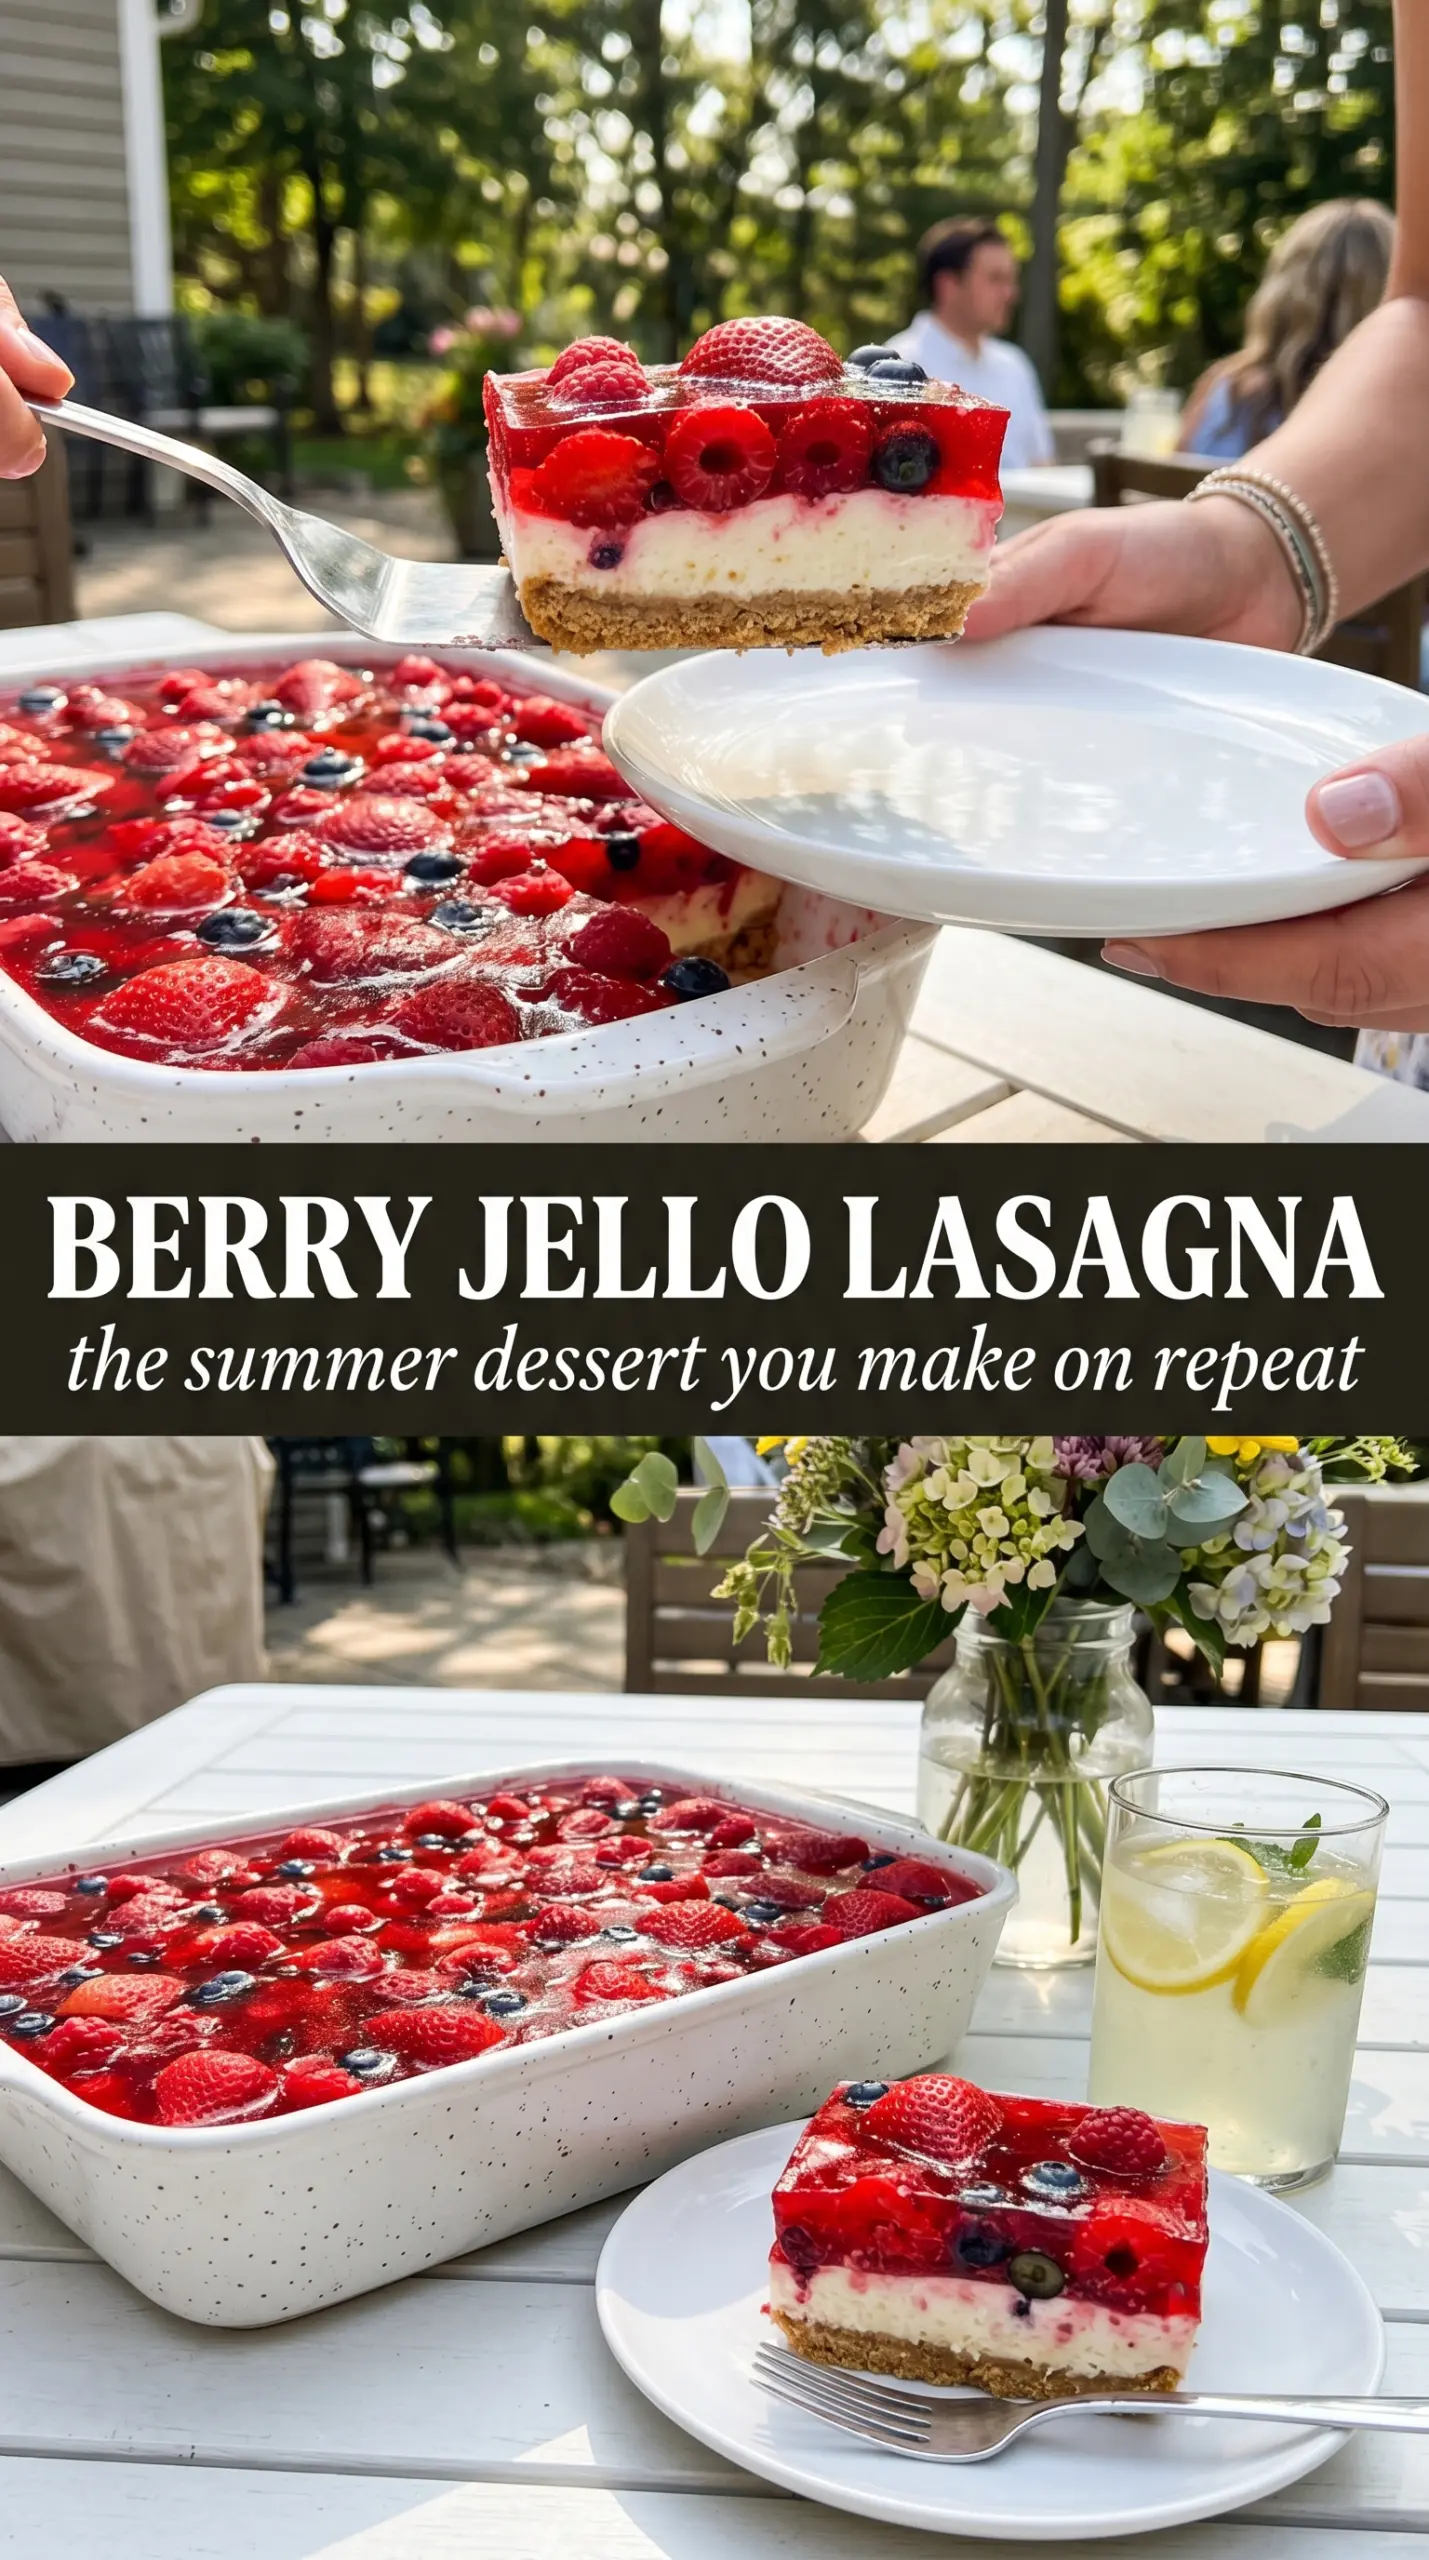
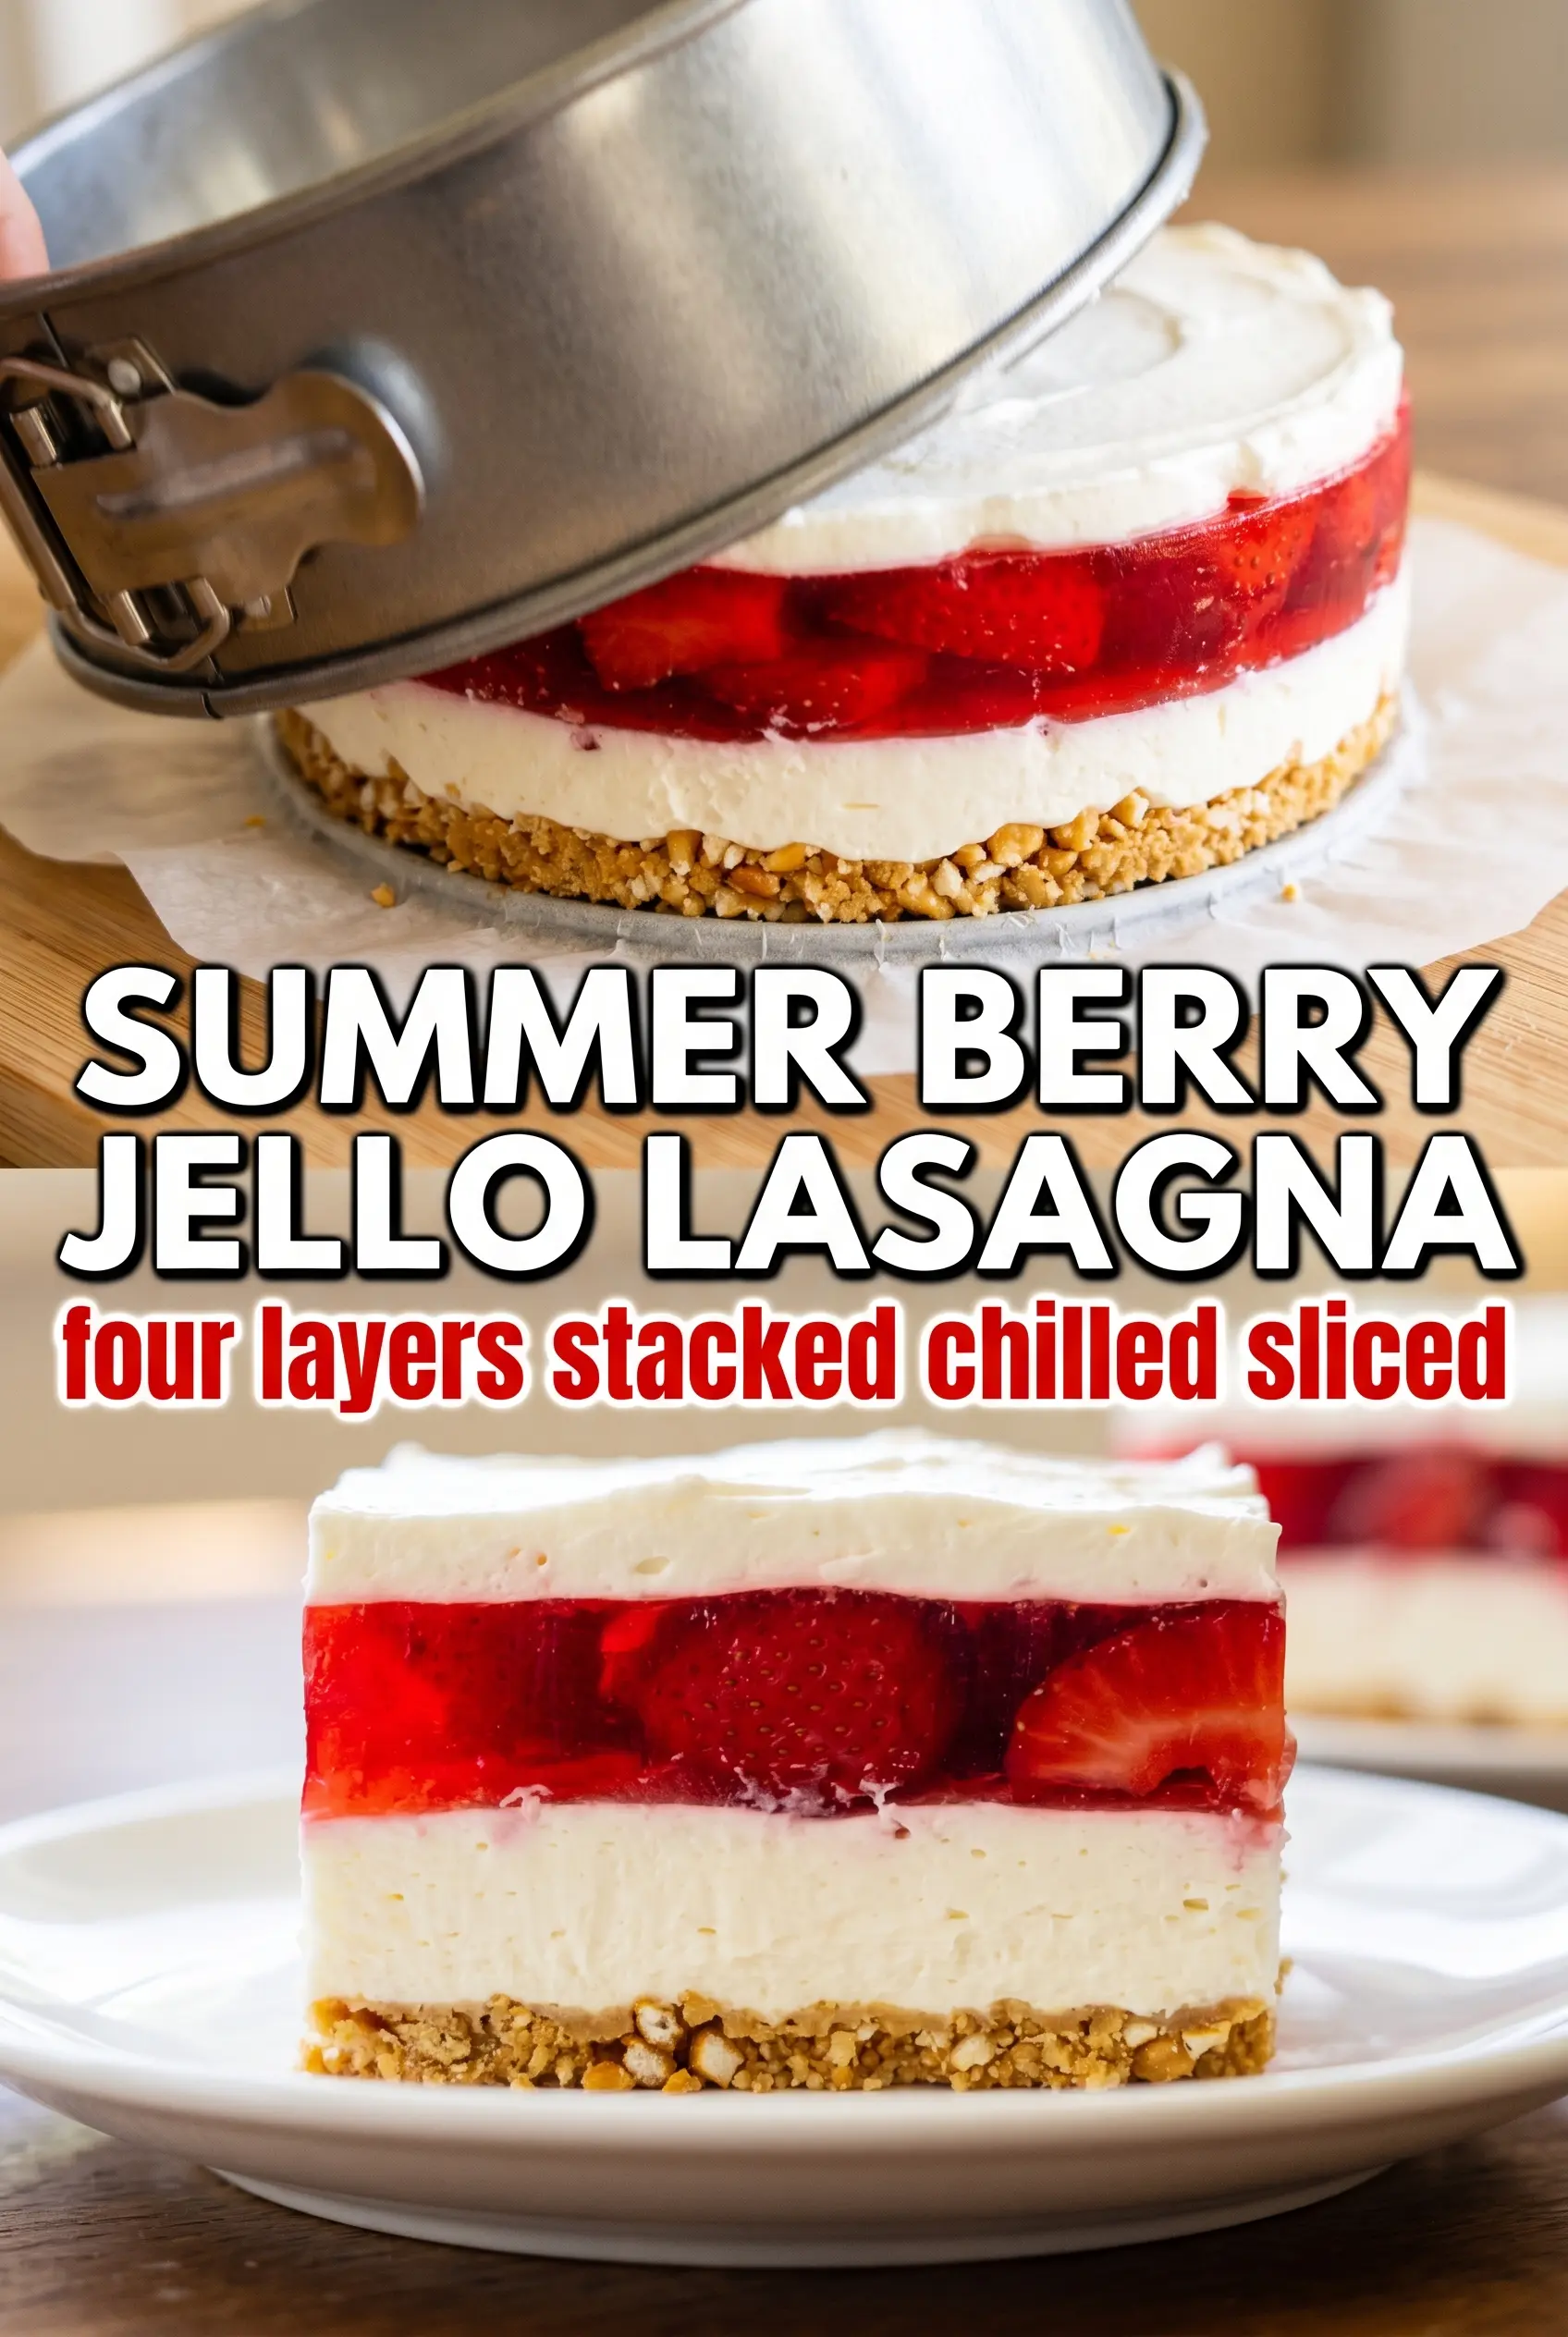
Summer Berry Jello Lasagna lands exactly where a good no-bake dessert should: cold, creamy, sliceable, and bright enough to stand out on a crowded table. The layers set up into clean stripes of ruby strawberry Jell-O, soft cream cheese filling, and blueberry Jell-O over a buttery Golden Oreo crust, so every bite gives you crunch, tang, and that nostalgic grocery-store-dessert comfort in one forkful.
What makes this version work is patience at the right moments. The Jell-O needs to cool all the way back down before it goes on the cream layer, or it can melt through and blur the layers. The cream cheese filling also needs to be beaten until completely smooth before the whipped topping goes in, because any lumps will show once the dessert chills. That little bit of care is what gives you those sharp, bakery-case-looking layers instead of a messy pan.
Below, I’ll walk through the timing that keeps the layers distinct, the ingredient choices that matter most, and the small fixes that help this dessert slice cleanly after chilling.
The layers set up perfectly and the Jell-O stayed bright and separate instead of bleeding into the cream cheese. I chilled it overnight and it sliced into clean squares just like the photo.
Like this strawberry-blueberry Jello lasagna? Save it to Pinterest for the next summer party when you need a chilled dessert with bold layers and zero oven time.
The Trick to Keeping the Jell-O Layers Clean and Separate
The biggest mistake with layered Jell-O desserts is rushing the cool-down. Warm Jell-O poured over the cream layer will melt the filling and sink into it, which leaves you with a muddy middle instead of distinct layers. Let each batch cool to room temperature before pouring, and don’t wait so long that it starts to thicken in the bowl.
The other thing that matters is structure. This dessert needs the cream cheese layer to be chilled before the first Jell-O goes on top, and it needs each Jell-O layer to fully set before the next one is added. That extra waiting time is what gives you those neat, sharp stripes when you cut into it.
- Golden Oreos — These make a sweeter, buttery crust that fits the berry layers better than a chocolate cookie crust would. Fine crumbs help the base press together tightly, so the bottom doesn’t crumble when you slice it.
- Cream cheese — Full-fat cream cheese gives the filling enough body to hold the Jell-O layers above it. Low-fat cream cheese can work, but the filling sets softer and may not slice as cleanly.
- Whipped topping — This keeps the middle light and stable. Whipped cream can be used in a pinch, but it won’t hold up quite as long in the fridge and can make the filling softer.
- Strawberry and berry blue Jell-O — The boxed gelatin gives you the vivid colors and dependable set that make this dessert shine. Fresh berry puree won’t give the same clean layer or sliceable texture.
What Each Ingredient Is Actually Doing in This Recipe
- Primary ingredient (the star) — Quality matters most. Choose the best you can find.
- Cooking medium (oil, butter, or broth) — This carries flavors and prevents dryness.
- Seasonings (salt, pepper, spices, herbs) — Layer flavors so nothing overpowers. Build depth gradually.
- Aromatics (garlic, onion, herbs) — Cook with fat to bloom flavors. Become the foundation.
- Supporting ingredients — Complement the main ingredient without overpowering it.
- Sauce or liquid (if applicable) — Brings flavors together. Balance richness with acid.
- Acid (lemon, vinegar, wine, or other) — Brightens and prevents flat-tasting results.
- Final finish (garnish, glaze, or sauce) — Prevents one-dimensional taste and adds visual appeal.
Building the Layers Without Smearing the Colors
Pressing the Crust Firmly
Mix the crushed Golden Oreos with melted butter until every crumb looks evenly coated, then press it into the bottom of the dish with real pressure. A loose crust falls apart the second a spatula goes in. Chill it until it feels firm and slightly set before adding the cream layer.
Whipping the Cream Layer Smooth
Beat the cream cheese and powdered sugar until the mixture is completely smooth, with no tiny lumps hiding at the bottom of the bowl. Fold in half the whipped topping gently so the filling stays light instead of dense. Spread it all the way to the edges so the Jell-O has a level base to rest on.
Cooling the Jell-O Before It Goes In
After dissolving each box of Jell-O, stir in the cold water and let it sit until it’s no longer warm to the touch. If it’s even a little hot, it will soften the cream layer and distort the line between colors. You want it cooled, fluid, and still fully liquid.
Setting Each Layer Before the Next One
Pour the strawberry Jell-O slowly over the back of a spoon or gently against the side of the dish so it lands softly on the cream layer. Chill it until set before adding the blueberry layer, because pouring the second layer too soon can create swirls where the colors meet. Finish with the remaining whipped topping only after the blue layer has set completely.
Three Smart Ways to Adapt This Jello Lasagna
Make it gluten-free with a cookie swap
Use gluten-free vanilla sandwich cookies in place of the Golden Oreos. The crust will still press together well as long as you keep the butter amount the same and crush the cookies finely. The flavor stays close, though the crust may be a little less rich and a little more crisp.
Swap in different berry colors
Cherry and blueberry Jell-O give you the same dramatic layered look with a slightly deeper, more punchy berry flavor. Peach or raspberry can work too, but stick with colors that contrast clearly so the layers stay visible when sliced.
Use homemade whipped cream for a lighter finish
You can replace the whipped topping with freshly whipped cream, but beat it to soft peaks and fold it in gently so it doesn’t collapse. The dessert will taste a little fresher and less sweet, though it won’t hold its shape quite as long after slicing.
Storage and Reheating
- Refrigerator: Keep covered for up to 4 days. The crust softens a little over time, but the layers stay neat if the dessert stays cold.
- Freezer: I don’t recommend freezing it. The Jell-O texture turns watery and the cream layer can separate after thawing.
- Reheating: No reheating needed. Serve it straight from the fridge for the cleanest slices; if it sits out too long, the layers start to slump.
Questions I Get Asked About This Recipe
Summer Berry Jello Lasagna
Ingredients
Equipment
Method
- Mix the finely crushed Golden Oreos with the melted butter until the crumbs look evenly coated, then press firmly into the bottom of a 9x13 dish. Refrigerate for 20 minutes to firm up the crust.
- Beat the softened cream cheese with the powdered sugar until smooth, then fold in half the whipped topping. Spread this over the chilled crust and refrigerate while you prepare the Jell-O.
- Dissolve the strawberry Jell-O in 1 cup boiling water, stir in 1/2 cup cold water, and cool to room temperature, without letting it set. Pour the cooled strawberry Jell-O gently over the cream cheese layer and refrigerate for 1 hour until set.
- Dissolve the berry blue Jell-O in 1 cup boiling water, stir in 1/2 cup cold water, and cool to room temperature. Pour the cooled blue Jell-O gently over the set strawberry layer and refrigerate for 1 more hour.
- Spread the remaining whipped topping over the top, then chill for another 30 minutes until ready to slice. Slice into rectangles to serve.