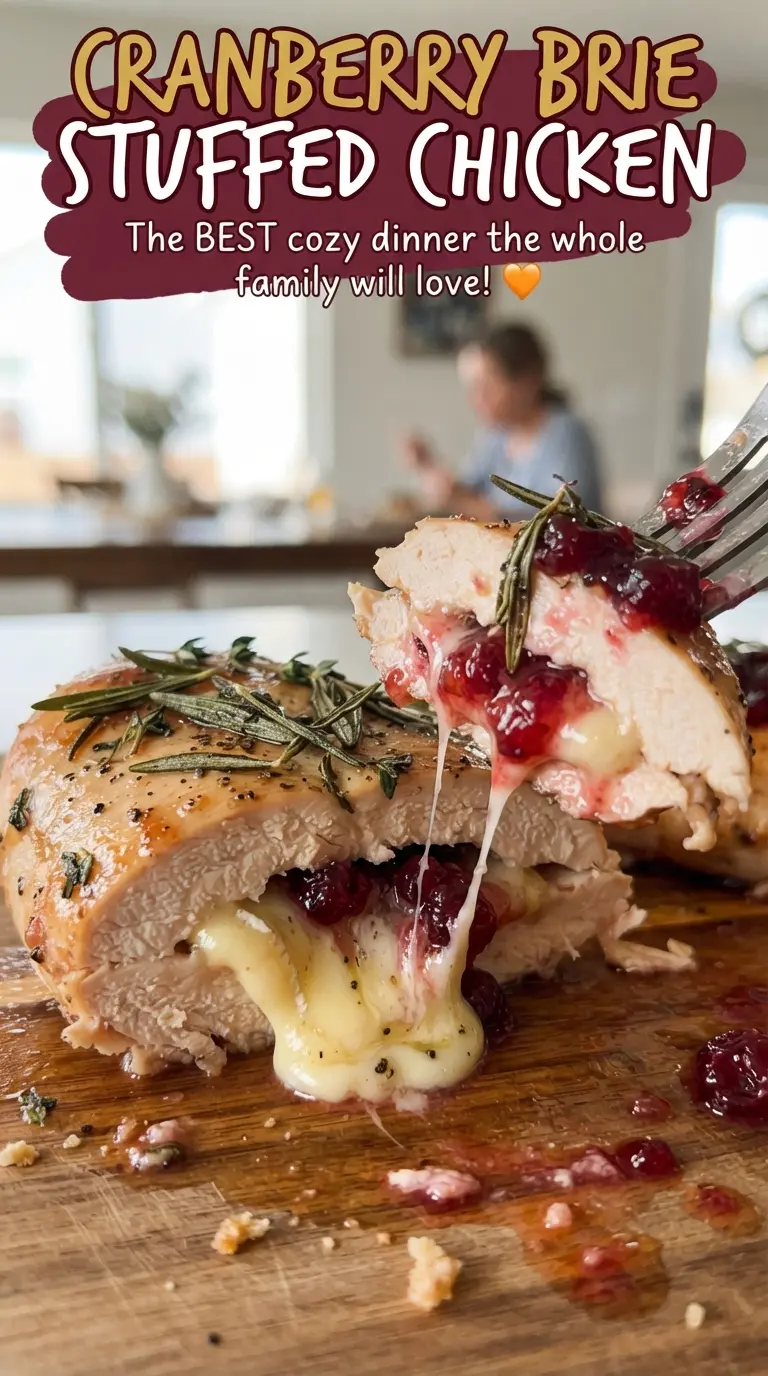
Cranberry Brie Stuffed Chicken lands on the plate with a golden sear, a molten cheese center, and a glossy pan sauce that tastes like you spent a lot more time on it than you did. The chicken stays juicy because the pocket filling melts from the inside instead of drying out in the oven, and the cranberry sauce keeps the Brie from feeling heavy. When you slice into it, the filling should spill out in a thick, ruby streak instead of disappearing into the meat.
The trick is getting the chicken browned before it goes into the oven. That first sear builds flavor and helps the breast hold its shape around the filling. The sauce gets finished in the same skillet, which means the browned bits dissolve into the cranberry, balsamic, and broth instead of getting left behind. That’s where the depth comes from.
Below, I’ve included the one step that matters most for keeping the cheese inside the chicken, plus a few ways to adapt the filling if you want to change up the herbs or make the dish work with what you already have.
The brie melted into the cranberry sauce exactly right, and the chicken stayed juicy after the oven. I was worried about the filling leaking, but the toothpicks held everything together and the sauce in the pan was outstanding.
Save Cranberry Brie Stuffed Chicken for the night you want juicy chicken, melted brie, and a tart cranberry pan sauce with almost no extra cleanup.
The Step That Keeps the Brie Inside the Chicken
The filling leaks when the pocket is cut too thin or stuffed too full. A deep pocket gives the cheese and cranberry sauce room to melt without forcing the seam open, and that little bit of spinach underneath helps keep the brie from sliding straight out as it softens. Toothpicks matter here. Use them to close the opening snugly, but don’t stab through the whole breast more than necessary or the juices will escape during baking.
Sealing the chicken starts before it hits the pan. Pat the breasts dry so the seasoning sticks and the surface browns instead of steaming. If the breasts are especially thick, pound them lightly on the thicker end so they cook at the same pace. That keeps the outside from overcooking while the center finishes and the brie melts.
What Each Ingredient Is Doing in This Dish
- Chicken breasts — Boneless, skinless breasts are sturdy enough to stuff and sear, but they need even thickness so the center cooks before the outside dries out. If yours are very large, split them carefully or pound the thick end so they finish more evenly.
- Brie — This is the ingredient that gives you the molten, rich center. Slice it instead of trying to cram in a whole wedge, because thinner pieces melt faster and stay tucked inside the pocket more cleanly.
- Whole berry cranberry sauce — The berries give the filling texture and help the pan sauce cling to the chicken. Jellied cranberry sauce will work in a pinch, but you’ll lose that fresh, jammy look and a little of the tart-sweet bite.
- Baby spinach — This adds a layer of freshness and keeps the filling from being all cheese and fruit. It wilts down fast, so there’s no need to cook it first.
- Chicken broth, honey, and balsamic vinegar — These build the pan sauce. The broth loosens the browned bits in the skillet, the honey smooths the cranberry’s tart edge, and the balsamic gives the sauce a deeper finish that keeps it from tasting one-note.
- Fresh rosemary — This is the herb that gives the sauce its savory, woodsy finish. Fresh matters here more than dried because it perfumes the sauce without making it taste dusty or overly intense.
Getting the Sear, Bake, and Pan Sauce in the Right Order
Cutting and stuffing without tearing the chicken
Slice a pocket into the side of each breast with the knife angled toward the center, not all the way through to the other side. You want a roomy opening, not a tunnel. Season the outside well, then tuck in the spinach, Brie, and cranberry sauce before closing the opening with toothpicks. If the pocket bursts while you stuff it, stop and widen the cut a little instead of forcing the filling in.
Building a browned crust before the oven
Heat the oil until it shimmers, then lay the chicken in and leave it alone long enough for a deep golden crust to form. If it sticks, it’s not ready to turn. Give it 3 to 4 minutes per side, just until the surface picks up color; the chicken won’t be cooked through yet, and that’s fine. The oven finishes the center without burning the outside.
Finishing in the oven without drying it out
Move the skillet straight into the oven and bake until the thickest part of the chicken reaches 165F. Pull it when it hits that temperature, not after, or the brie will keep melting and the meat will start to tighten. Letting the chicken rest for a few minutes keeps the juices from running out the second you slice it.
Turning the skillet drippings into sauce
After the chicken comes out, keep the skillet on the stove and add the broth, remaining cranberry sauce, honey, balsamic, and rosemary. Scrape the bottom well so the browned bits dissolve into the sauce, then simmer just until it thickens slightly and looks glossy. If it boils hard, the sauce can tighten too much and taste sharp instead of balanced.
How to Adapt This Chicken for Different Nights
Make it dairy-free
Swap the Brie for a dairy-free soft cheese that melts well, but expect a milder flavor and a slightly less luxurious center. Add an extra pinch of salt to the filling, since many dairy-free cheeses are less savory than Brie.
Use goat cheese instead of Brie
Goat cheese gives you a tangier filling that stands up well to the cranberry sauce. It won’t flow quite as luxuriously as Brie, but it holds its shape better and makes the dish taste a little brighter.
Make it gluten-free without changing the method
This recipe is naturally gluten-free as written, so there’s nothing to replace. Just check that your cranberry sauce and chicken broth don’t contain added thickeners or gluten-based flavorings if you’re cooking for someone with an allergy.
Swap the herbs for a different profile
If rosemary isn’t your thing, use chopped sage or thyme in the sauce. Sage gives the dish a more traditional holiday feel, while extra thyme keeps everything soft and savory without competing with the cranberry.
Storage and Reheating
- Refrigerator: Store the chicken and sauce in an airtight container for up to 3 days. The Brie will firm up, but the flavor holds nicely.
- Freezer: Freeze after cooking if needed, wrapped well and packed with a little sauce to protect the chicken from drying out. The texture of the Brie changes a bit after thawing, but it still reheats well enough for a second meal.
- Reheating: Reheat covered in a 325F oven until warmed through. The biggest mistake is blasting it in the microwave, which pushes the cheese out and turns the chicken rubbery before the center is hot.
Questions I Get Asked About This Recipe

Cranberry Brie Stuffed Chicken
Ingredients
Equipment
Method
- Preheat the oven to 400F and place an oven-safe skillet near the stove. This keeps cooking from slowing down once the chicken is seared.
- Cut a deep pocket into the side of each chicken breast, then season the outside with salt, black pepper, garlic powder, and dried thyme. Make sure the seasoning coats the exterior so it forms a flavorful crust.
- Stuff each pocket with baby spinach, brie, and 1 tablespoon whole berry cranberry sauce, then secure with toothpicks. Keep the filling compact so the chicken stays evenly stuffed.
- Heat olive oil in the hot skillet and sear the chicken 3-4 minutes per side until golden. The browned surface should be visible before baking.
- Transfer the skillet to the oven and bake 15-18 minutes, until the chicken reaches 165F. The chicken should be cooked through and the juices should run clear.
- Remove the chicken from the skillet and add chicken broth, remaining whole berry cranberry sauce, honey, balsamic vinegar, and fresh rosemary, chopped. Loosen the browned bits so the sauce turns fragrant.
- Simmer the sauce for 3 minutes in the skillet. It should reduce slightly and look glossy.
- Spoon the sauce over the chicken and serve. Pull out the toothpicks before plating.