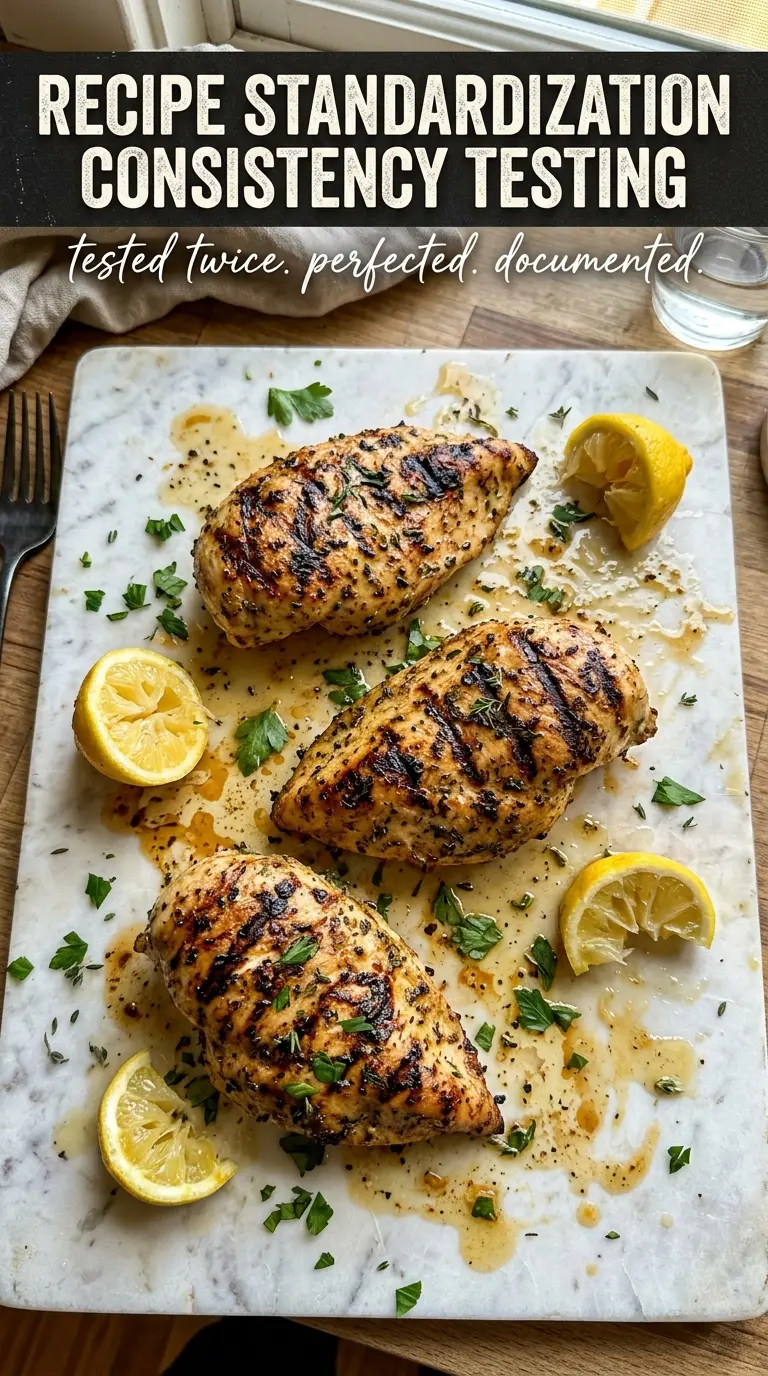
Juicy grilled chicken with crisp, caramelized edges and a balanced marinade earns its place in the rotation fast. The soy sauce and Worcestershire give it depth, the lemon keeps it bright, and the brown sugar helps the outside pick up those dark grill marks without tasting sweet. What comes off the grill tastes like classic backyard chicken done the right way: seasoned all the way through, not just on the surface.
The difference here is in the marinade balance and the rest time. Lemon juice brings the flavor up, but too much acid for too long can turn the chicken mealy, so this version stays in the safe zone with a 2 to 8 hour window. A little Dijon helps the marinade cling, garlic gives it that familiar savory backbone, and olive oil keeps the chicken from drying out over the heat.
Below, I’ll walk through the part that matters most on the grill: how to keep the chicken juicy while still getting real color. I’ve also included the substitutions that work best if you need to adjust the marinade or cook it for a different crowd.
The marinade gave the chicken this deep savory flavor and the grill marks came out perfect. I pulled it at 165 and it was still juicy after resting.
Save this all-star grilled chicken for the nights when you want juicy, well-marked chicken with a quick soy-lemon marinade.
The Marinade Timing That Keeps Chicken Juicy Instead of Mushy
With grilled chicken, the most common mistake is leaving it in an acidic marinade too long and expecting extra flavor to turn into extra juiciness. Lemon juice and Worcestershire do the heavy lifting here, but they need a limit. Two to eight hours gives the chicken enough time to absorb the seasoning without letting the acid start changing the texture in a bad way.
Another trap is cooking chicken straight from the fridge and guessing at doneness by color. Cold chicken takes longer to cook through, which often means the outside gets too dark before the center is ready. Let the grill come up to medium-high heat, then cook to 165°F at the thickest part and rest the chicken for 5 minutes so the juices settle back in.
What Each Ingredient Is Actually Doing in This Marinade
- Chicken pieces — Bone-in pieces stay juicier and handle grill heat better than thin boneless cuts. If you use boneless chicken breasts, keep a close eye on them because they cook faster and dry out sooner.
- Olive oil — This helps carry the marinade and keeps the chicken from sticking to the grates. A neutral oil works in a pinch, but olive oil adds a little richness that fits the rest of the ingredients.
- Soy sauce — This gives salt, color, and that deep savory base you can taste in every bite. Low-sodium soy sauce works if that’s what you keep on hand, but don’t skip it entirely or the marinade will taste flat.
- Lemon juice — Fresh lemon juice brightens the marinade and keeps the chicken from tasting heavy. Bottled lemon juice will work, but fresh gives a cleaner finish.
- Dijon mustard — Dijon helps the marinade emulsify so the oil and acid stay blended instead of separating. It also adds a subtle tang that rounds out the sweetness from the brown sugar.
- Brown sugar — This is what helps the chicken caramelize on the grill. You don’t need much, but it matters for color and for balancing the lemon and soy.
- Garlic, black pepper, and paprika — Garlic brings the savory edge, pepper adds heat, and paprika gives the chicken a warm color before it ever hits the grill. Smoked paprika works if you want a deeper barbecue note.
Grilling It Hot Enough to Mark Without Drying It Out
Mixing the Marinade Until It Stays Together
Whisk the olive oil, soy sauce, lemon juice, Worcestershire sauce, Dijon, garlic, brown sugar, black pepper, and paprika until the sugar dissolves and the mixture looks cohesive. If the marinade looks separated, keep whisking for another 20 to 30 seconds. That matters because a well-blended marinade coats the chicken more evenly and gives you better browning later.
Marinating for Flavor, Not for Texture Damage
Coat the chicken pieces thoroughly, cover them, and refrigerate for 2 to 8 hours. Less than 2 hours and the seasoning doesn’t have enough time to soak in; much longer than 8 hours and the lemon can start to soften the surface too much. Turn the chicken once or twice if you can so every piece gets the same treatment.
Setting Up the Grill for Real Color
Preheat the grill to medium-high heat and let the grates get fully hot before the chicken goes on. If the grill is only barely warm, the chicken steams first and browns later, which is how you lose those clean marks. Lightly oil the grates if needed, then lay the chicken down and leave it alone long enough to sear.
Cooking to Temperature, Not Guesswork
Turn the chicken occasionally so it cooks evenly and doesn’t burn in one spot. Pull it when the thickest part reaches 165°F, even if the outside looks finished a minute earlier. The biggest mistake here is chasing dark grill marks while ignoring the center; that’s how you end up with dry edges and undercooked meat.
Resting So the Juices Stay Put
Move the chicken to a plate and let it rest for 5 minutes before serving. That short rest makes the juices settle instead of running out the second you slice into it. If you cut it too soon, the board catches everything you wanted to stay in the meat.
Ways to Adjust This Chicken Without Losing the Point
Boneless Chicken Breast Version
Use boneless chicken breasts if that’s what you have, but pound them to an even thickness so the thick end doesn’t dry out before the thin end is done. They’ll grill faster than bone-in pieces, so start checking temperature early and pull them the moment they hit 165°F.
Dairy-Free and Gluten-Free as Written
This recipe is naturally dairy-free, and it can be gluten-free if you use a certified gluten-free soy sauce. That swap keeps the same savory backbone without changing the method or the flavor balance.
Smokier BBQ-Style Chicken
Swap regular paprika for smoked paprika and add a pinch more brown sugar if you want a deeper backyard barbecue note. You’ll get a darker, slightly sweeter crust, but the chicken will still taste like this recipe instead of a heavy sauce-driven barbecue version.
Storage and Reheating
- Refrigerator: Store leftovers in an airtight container for up to 4 days. The flavor holds up well, though the exterior won’t stay as crisp.
- Freezer: Freeze cooked chicken for up to 2 months, wrapped tightly and sealed well. Thaw it in the refrigerator overnight so it reheats evenly.
- Reheating: Reheat covered in a 300°F oven with a splash of water or chicken broth until just warmed through. High heat dries grilled chicken out fast, so skip the microwave blast if you want to keep it juicy.
Answers to the Questions Worth Asking

All-Star Grilled Chicken
Ingredients
Equipment
Method
- Whisk together olive oil, soy sauce, lemon juice, Worcestershire sauce, Dijon mustard, minced garlic, brown sugar, black pepper, and paprika until smooth and evenly combined. The mixture should look glossy and fully blended, with no visible sugar clumps.
- Place the chicken pieces in a refrigerator-safe container and pour the marinade over top, turning to coat. Refrigerate for 2-8 hours so the chicken absorbs the flavor.
- Preheat the grill to medium-high heat, aiming for steady heat before you add the chicken. You should see consistent sizzling potential when the chicken is placed on the grate.
- Grill the chicken, turning occasionally, until the internal temperature reaches 165°F. Continue until the outside is nicely marked and the thickest piece is fully cooked.
- Let the grilled chicken rest for 5 minutes before serving. The juices should redistribute, making each bite feel tender and not watery.